Client Setup - Part 5
- Part 1 - Install the framework
- Part 2 - Initialize the framework
- Part 3 - User login & signup screens
- Part 4 - Register app in the dashboard
- Part 5 - Configure push notifications
Configure push notifications
ZeroDark.cloud provides real-time sync & messaging. This requires push notifications to work properly. The process can be broken down into 3 steps:
- Stuff you need to do in Xcode
- Stuff you need to do on Apple's developer website
- Stuff you need to do on the ZeroDark.cloud dashboard
Xcode Tasks
The app needs to be configured to handle remote push notifications. To do this, it must have the proper entitlements to talk to APNs. You add this entitlement to your app using the Capabilities pane of your Xcode project:

Click the "+" button to add the capability:
- Push notifications
On iOS you also need to enable background modes, and enable the following:
- Background fetch
- Remote notifications
Next we need to enable permission for the app to access Photos & Camera:
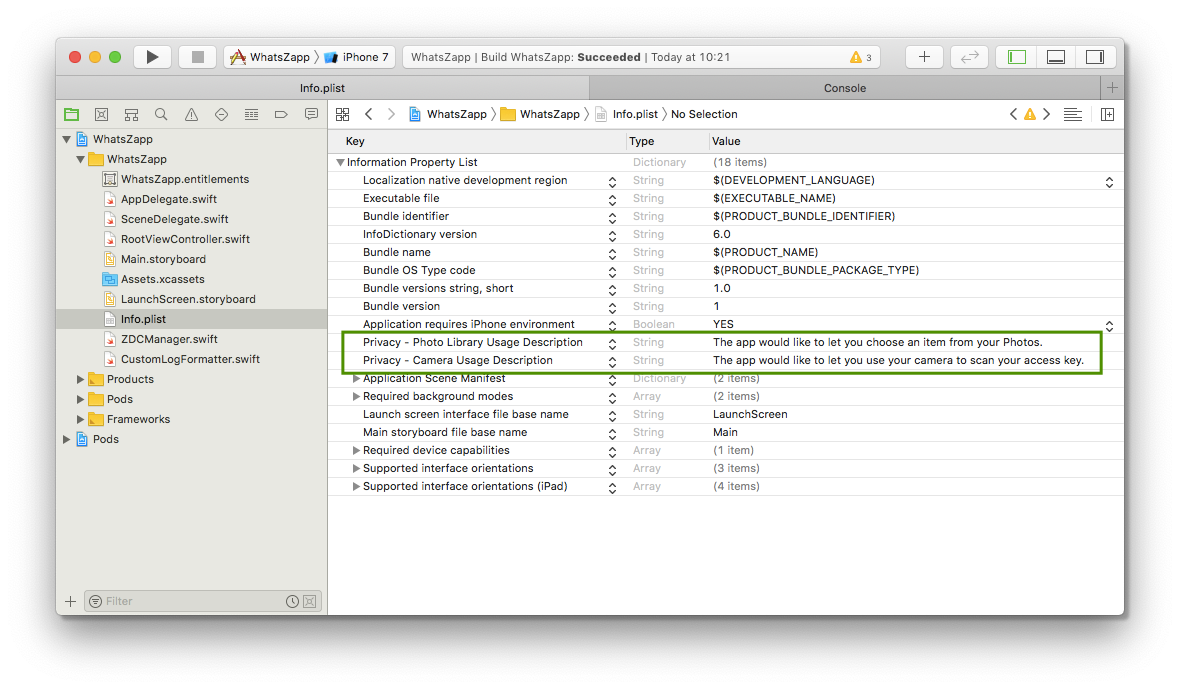
The app uses these permissions during sign-in to obtain the access key. (If you're using your own custom authentication system, you may be able to skip these.)
The raw key names are:
- "Privacy: Photo Library Usage Description" == NSPhotoLibraryUsageDescription
- "Privacy: Camera Usage Description" == NSCameraUsageDescription
Optionally if you plan to use FaceID biometric authentication to unlock the database you will also need to add the following key to the plist.
- "Privacy: Face ID Usage Description" == NSFaceIDUsageDescription
Next we need to add code to:
-
register the app for remote push notifications
-
handle registration success / failure
-
handle incoming push notifications
The process is slightly different for iOS/tvOS vs macOS. You can copy code from the snippets below into your AppDelegate.
iOS: Swift
//
// iOS: Swift
//
func application(_ application: UIApplication,
                 didFinishLaunchingWithOptions launchOptions: [UIApplicationLaunchOptionsKey: Any]?) -> Bool {
    // Configure the UI and other stuff...

    // Register for remote notifications.
    UIApplication.shared.registerForRemoteNotifications()
}

// Handle remote notification registration.
func application(_ application: UIApplication,
                 didRegisterForRemoteNotificationsWithDeviceToken deviceToken: Data){
    // Forward the token to ZeroDarkCloud framework,
    // which will automatically register it with the server.
    zdc.didRegisterForRemoteNotifications(withDeviceToken: deviceToken)
}

func application(_ application: UIApplication,
                 didFailToRegisterForRemoteNotificationsWithError error: Error) {
    // The token is not currently available.
    print("Remote notification support is unavailable due to error: \(error.localizedDescription)")
}

// Handle incoming remote notifications
func application(_ application: UIApplication,
                 didReceiveRemoteNotification userInfo: [AnyHashable : Any],
                 fetchCompletionHandler completionHandler: @escaping (UIBackgroundFetchResult) -> Void)
{
    // Forward to ZeroDarkCloud framework
    zdc.didReceiveRemoteNotification(userInfo, fetchCompletionHandler: completionHandler)
}
iOS: Objective-C
//
// iOS: Objective-C
//
- (void)applicationDidFinishLaunching:(UIApplication *)app {
    // Configure the UI and other stuff...

    // Register for remote notifications.
    [[UIApplication sharedApplication] registerForRemoteNotifications];
}

// Handle remote notification registration.
- (void)application:(UIApplication *)app
        didRegisterForRemoteNotificationsWithDeviceToken:(NSData *)deviceToken {
    // Forward the token to ZeroDarkCloud framework,
    // which will automatically register it with the server.
    [zdc didRegisterForRemoteNotificationsWithDeviceToken:deviceToken];
}

- (void)application:(UIApplication *)app
        didFailToRegisterForRemoteNotificationsWithError:(NSError *)err {
    // The token is not currently available.
    NSLog(@"Remote notification support is unavailable due to error: %@", err);
}

// Handle incoming remote notifications
- (void)application:(UIApplication *)application
        didReceiveRemoteNotification:(NSDictionary *)userInfo
        fetchCompletionHandler:(void (^)(UIBackgroundFetchResult result))completionHandler
{
    // Forward to ZeroDarkCloud framework
    [zdc didReceiveRemoteNotification:userInfo fetchCompletionHandler:completionHandler];
}
macOS: Swift
//
// macOS: Swift
//
func applicationDidFinishLaunching(_ aNotification: Notification) {
    // Configure the UI and other stuff...

    // Register for remote notifications.
    NSApplication.shared().registerForRemoteNotifications()
}

// Handle remote notification registration.
func application(_ application: NSApplication,
                 didRegisterForRemoteNotificationsWithDeviceToken deviceToken: Data) {
    // Forward the token to ZeroDarkCloud framework,
    // which will automatically register it with the server.
    zdc.didRegisterForRemoteNotifications(withDeviceToken: deviceToken)
}

func application(_ application: NSApplication,
                 didFailToRegisterForRemoteNotificationsWithError error: Error) {
    // The token is not currently available.
    print("Remote notification support is unavailable due to error: \(error.localizedDescription)")
}

// Handle incoming remote notifications
func application(_ application: UIApplication,
                 didReceiveRemoteNotification userInfo: [AnyHashable : Any]) {
    // Forward to ZeroDarkCloud framework
    zdc.didReceiveRemoteNotification(userInfo)
}
macOS: Objective-C
//
// macOS: Objective-C
//
- (void)applicationDidFinishLaunching:(NSNotification *)notification {
    // Configure the UI and other stuff...

    // Register for remote notifications.
    [NSApp registerForRemoteNotifications];
}

- (void)application:(NSApplication *)application
        didRegisterForRemoteNotificationsWithDeviceToken:(NSData *)deviceToken {
    // Forward the token to ZeroDarkCloud framework,
    // which will automatically register it with the server.
    [zdc didRegisterForRemoteNotificationsWithDeviceToken:deviceToken];
}

- (void)application:(NSApplication *)application
        didFailToRegisterForRemoteNotificationsWithError:(NSError *)error {
    NSLog(@"Remote notification support is unavailable due to error: %@", error);
}

// Handle incoming remote notifications
- (void)application:(UIApplication *)application
        didReceiveRemoteNotification:(NSDictionary *)userInfo
{
    // Forward to ZeroDarkCloud framework
    [zdc didReceiveRemoteNotification:userInfo];
}
Apple Developer Website Tasks
Go to Apple's developer website, and login to your account. Then navigate to your certificates list:
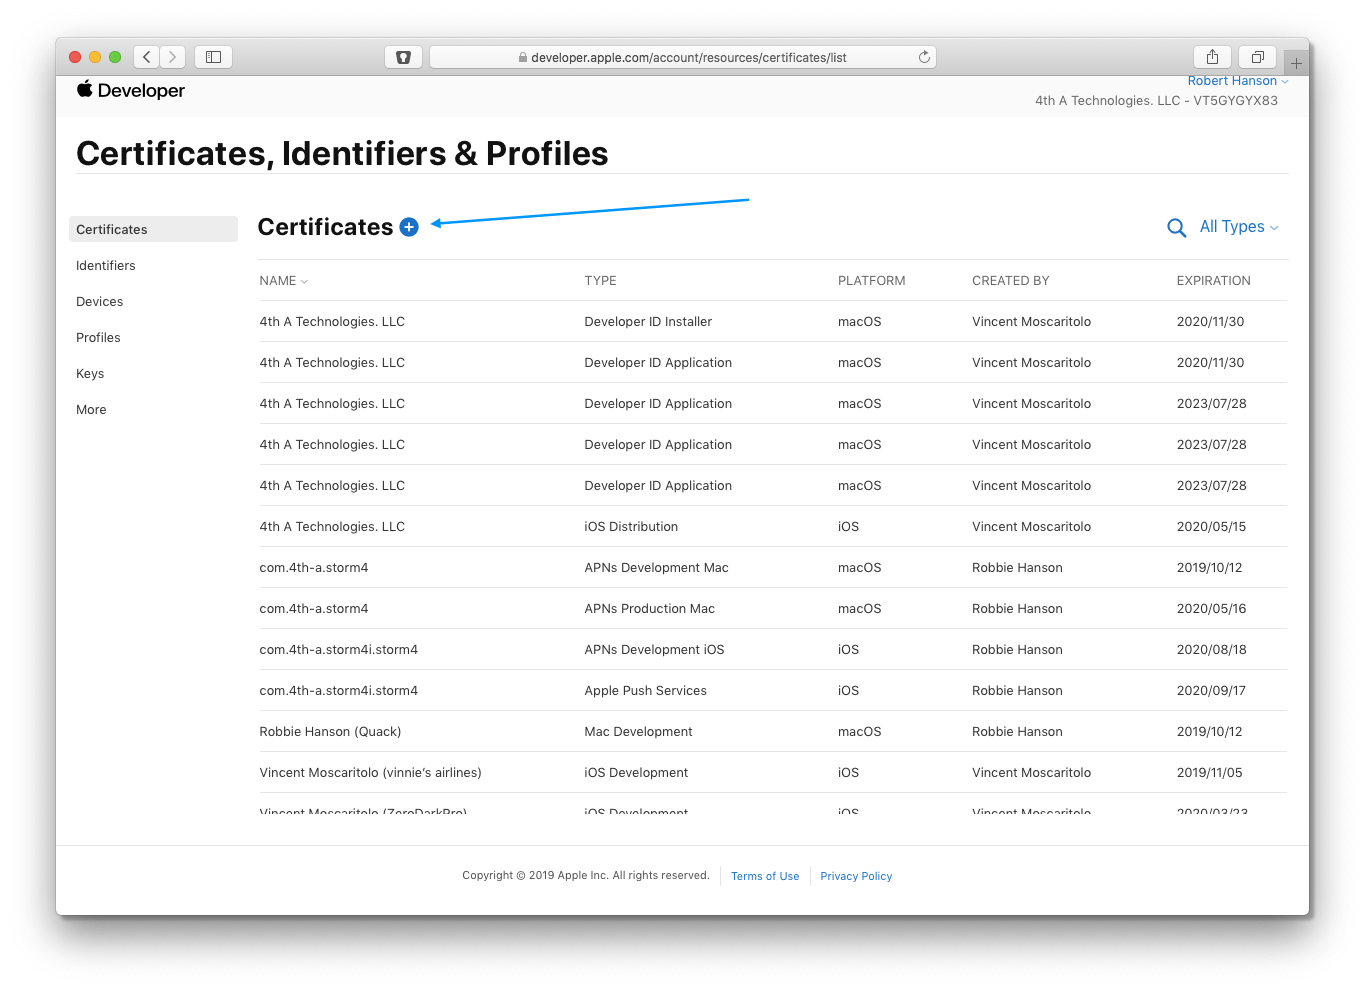
Then click the Plus button to create a new certificate.
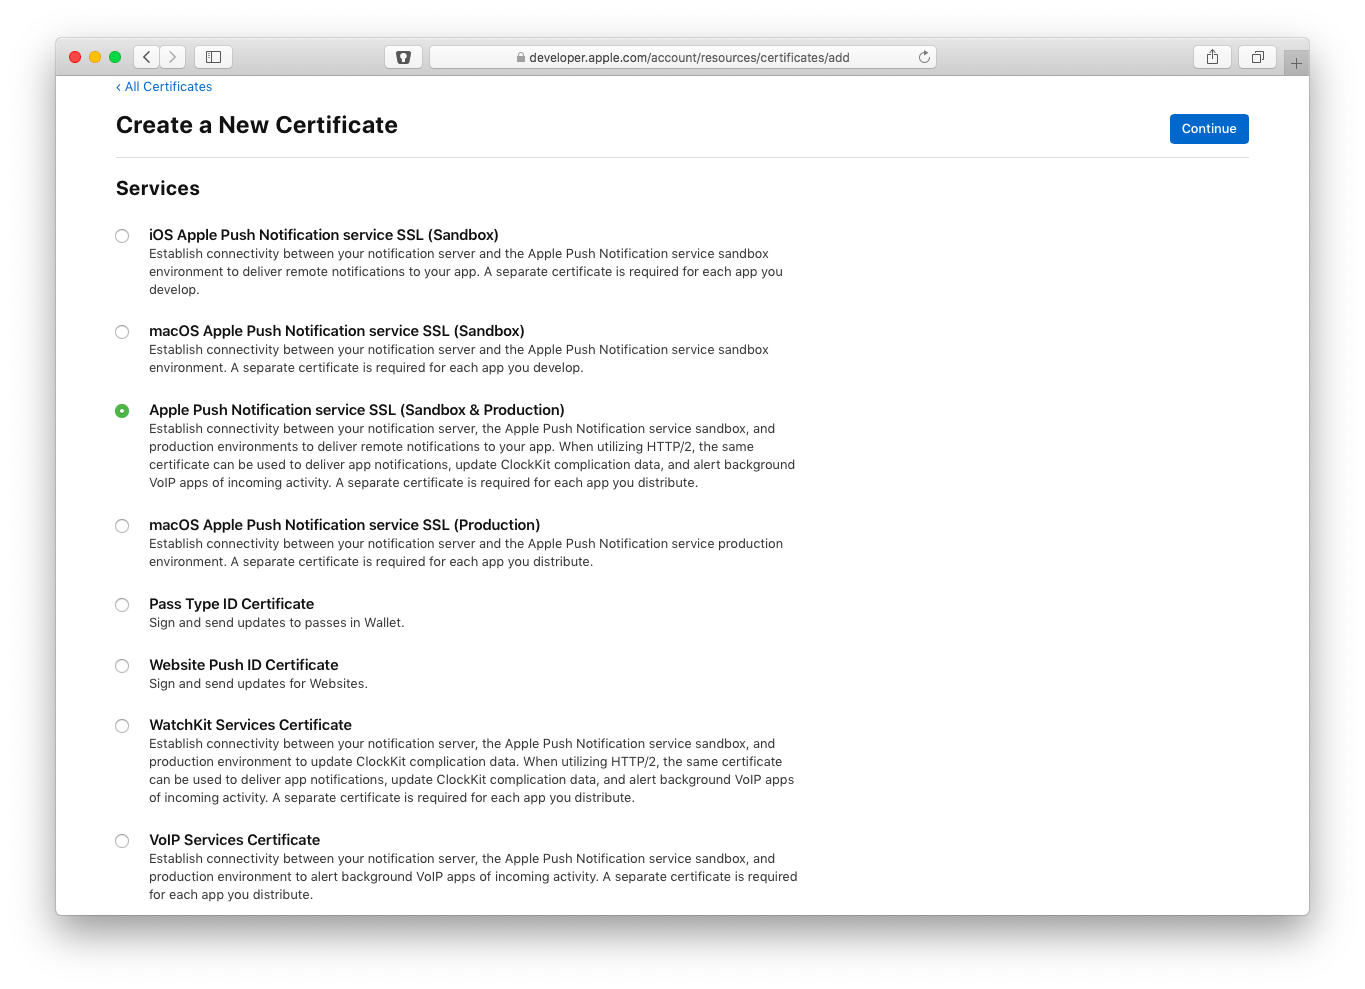
Select the type of push certificate you want to create. For iOS, you only need to create a single certificate, which can be used for both Sandbox & Production. For macOS, you'll need to create 2 separate certificates, one for Sandbox & another for Production.
Click Continue, and then be sure to select the correct AppID:
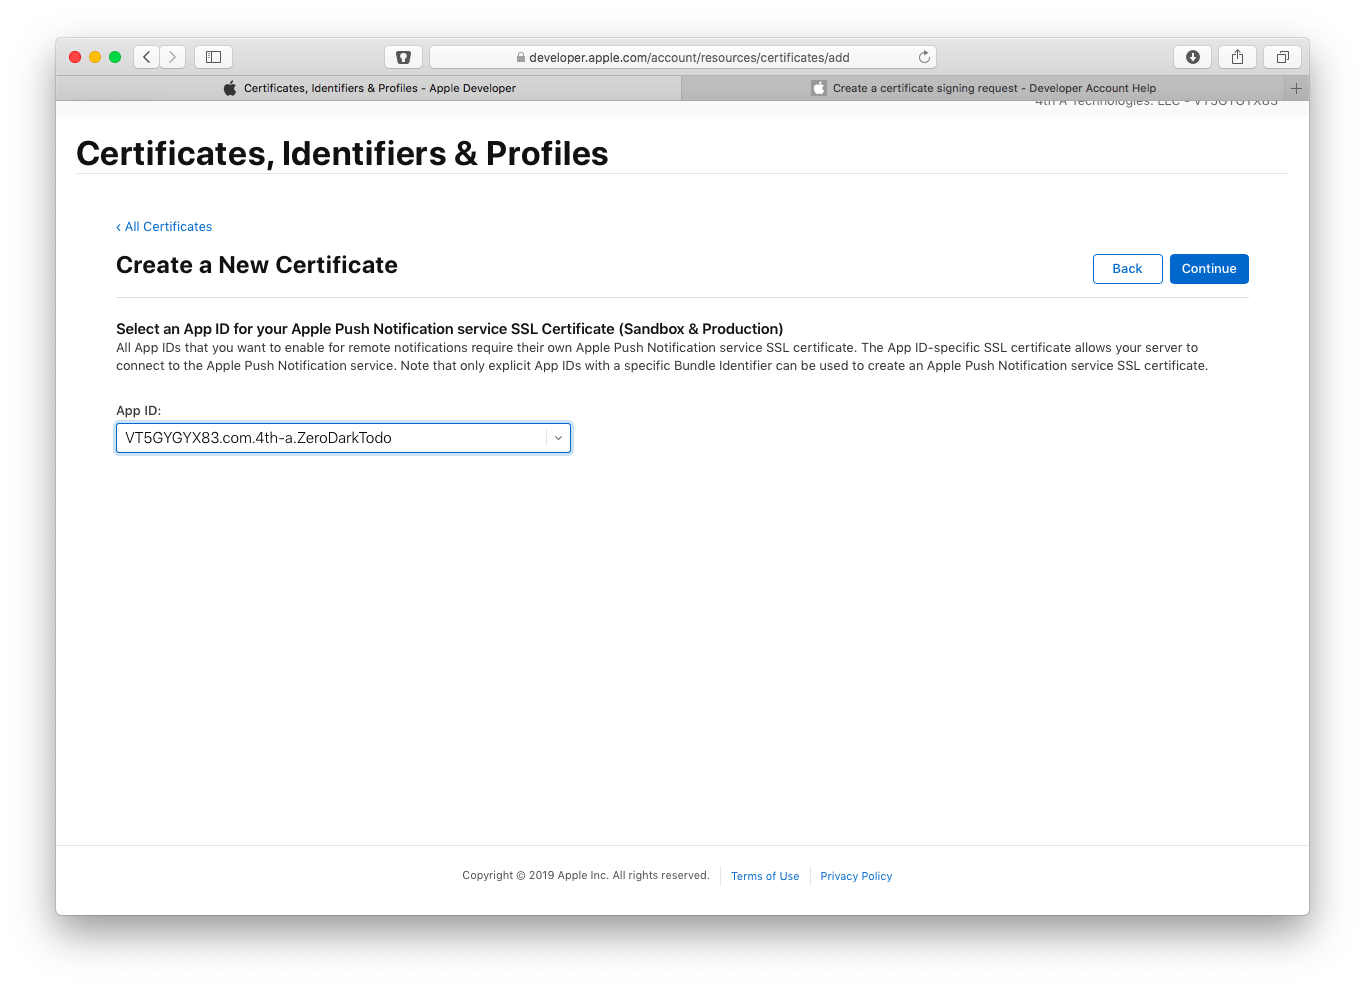
Remember, the term "AppID" refers to your Bundle Identifier in Xcode. (i.e. the value in your Info.plist file.)
Next click Continue, and follow the rest of Apple's instructions to finish the process. When you're done, download your certificate:
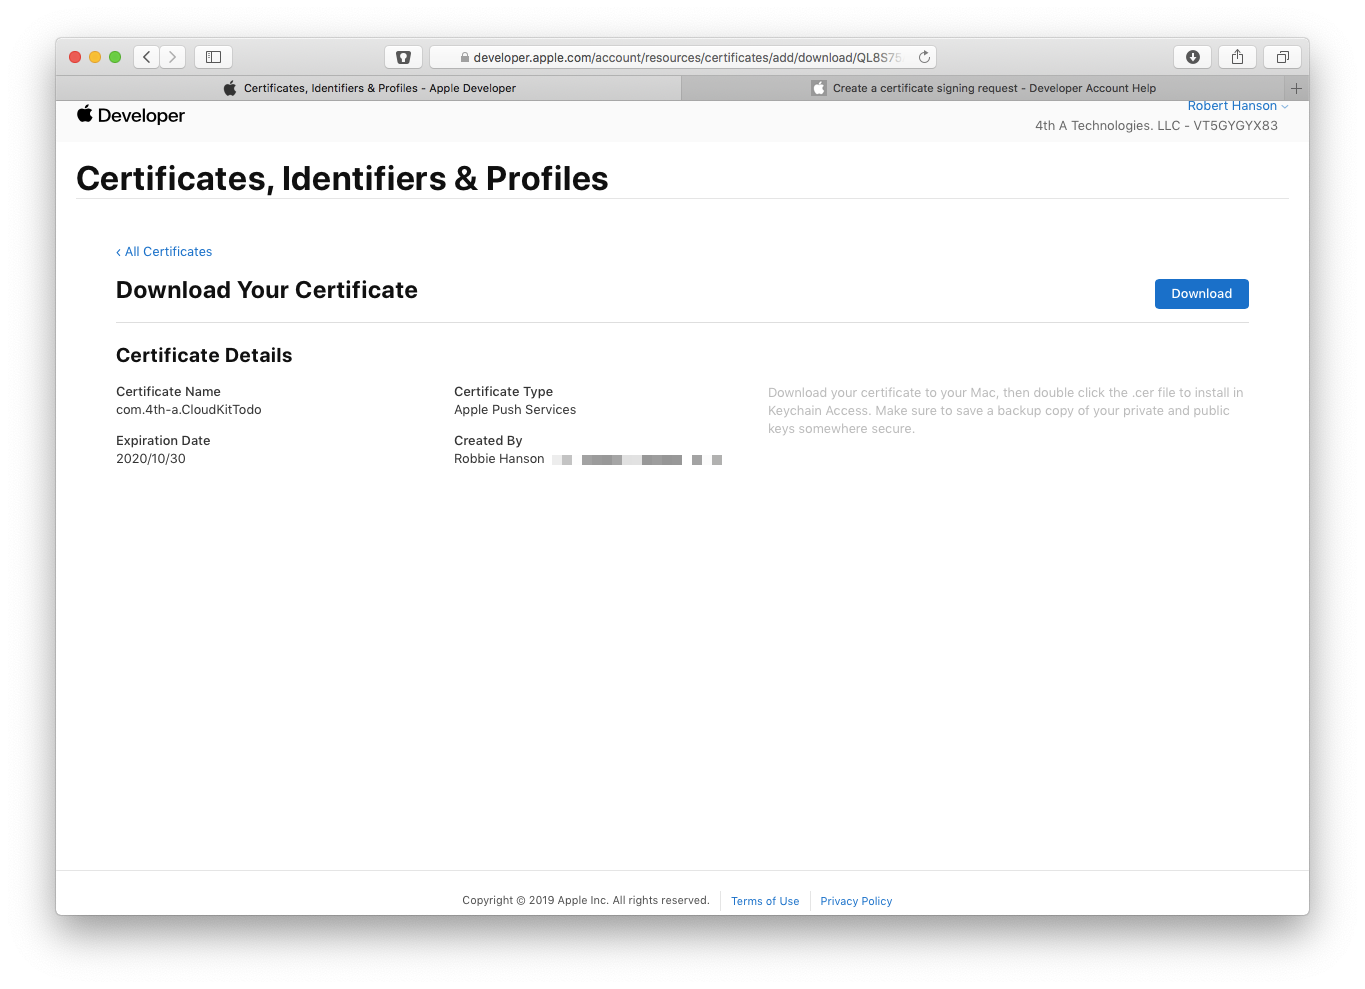
The file you download will probably be called something like "aps.cer". Double-click the file to import it into your Keychain:
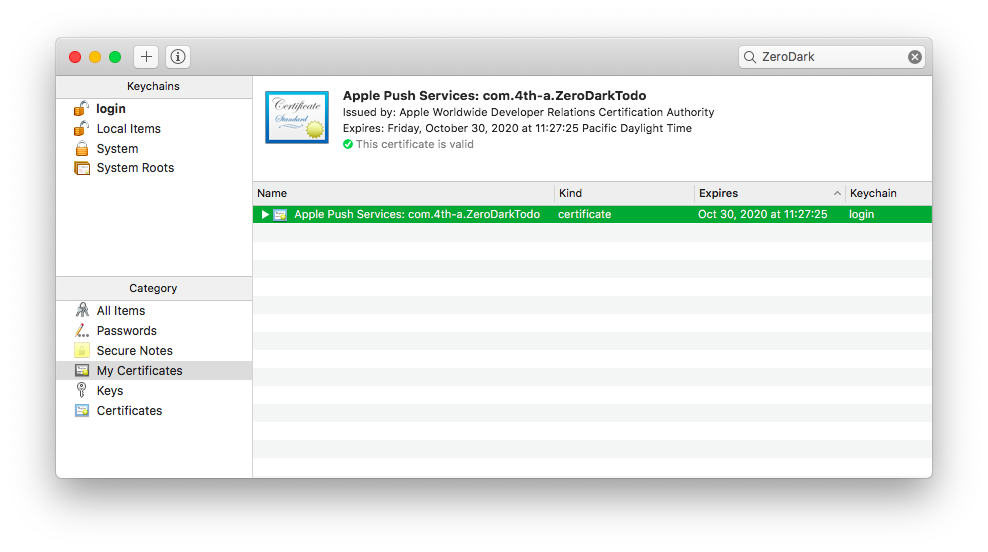
Now select the imported certificate, and export it as a P12 file:
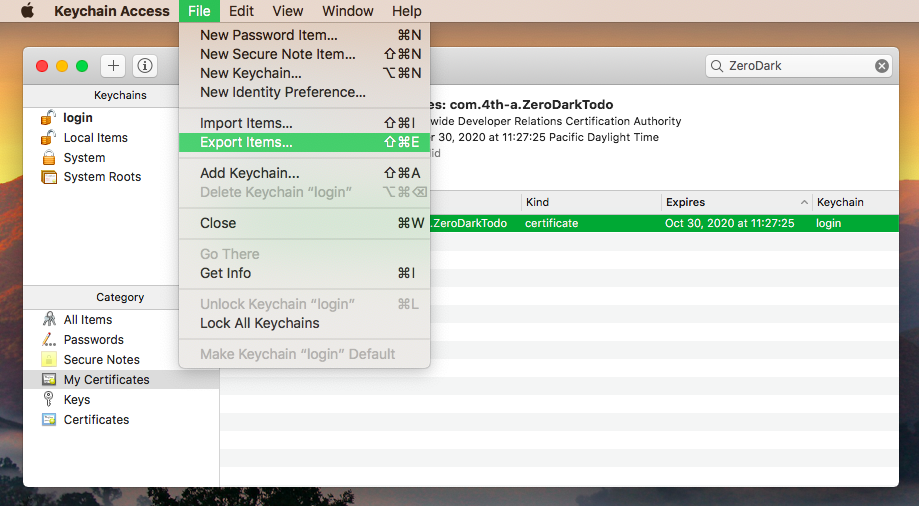
Save the P12 file using the name "certAndPrivKey.p12".
Notes:
- Be sure to select & export the certificate, and not just the private key.
- The P12 file is temporary. We're going to throw it away in a moment.
- The keychain will prompt you for a password for the P12. We're going to use this password on the command line in a moment. So you may want to avoid using spaces in your password. Also the command line tools seem to fail with really long passwords (like 64 characters). We've tested up to 32 characters without problems.
Now we need to convert the exported P12 file to a PEM file. So open up your terminal, and navigate to the directory where you saved the "certAndPrivKey.p12" file. Then use this command to convert it to a PEM file:
$ openssl pkcs12 -in certAndPrivKey.p12 -out certAndPrivKey.pem -nodes -clcerts
This will create another file named "certAndPrivKey.pem". This is just a text file that contains the certificate & private key in a plain text format. It should look something like this:
Bag Attributes
    friendlyName: Apple Push Services: com.4th-a.ZeroDarkTodo
    localKeyID: F5 C3 8B 7D A4 54 D4 A7 CD 55 F4 F2 9A 91 62 4C 3A 6B 22 3E
subject=/UID=com.4th-a.ZeroDarkTodo/CN=Apple Push Services: com.4th-a.ZeroDarkTodo/OU=VT5GYGYX83/O=4th A Technologies. LLC/C=US
issuer=/C=US/O=Apple Inc./OU=Apple Worldwide Developer Relations/CN=Apple Worldwide Developer Relations Certification Authority
-----BEGIN CERTIFICATE-----
<... a lot of Base64 characters here ...>
-----END CERTIFICATE-----
Bag Attributes
    friendlyName: 4th-A Technologies, LLC
    localKeyID: F5 C3 8B 7D A4 54 D4 A7 CD 55 F4 F2 9A 91 62 4C 3A 6B 22 3E
Key Attributes: <No Attributes>
-----BEGIN PRIVATE KEY-----
<... a lot of Base64 characters here ...>
-----END PRIVATE KEY-----
Verify your certificate & key
Before we continue, it's wise to verify we've performed all tasks correctly so far. We can do that on the command line by attempting to connect to the APNS server.
Follow the instructions below, based on the type of certificate you have.
iOS Sandbox (using HTTP/2 provider API):
$ openssl s_client -connect api.development.push.apple.com:443 -key certAndPrivKey.pem -debug -showcerts -cert certAndPrivKey.pem
iOS Production (using HTTP/2 provider API):
$ openssl s_client -connect api.push.apple.com:443 -key certAndPrivKey.pem -debug -showcerts -cert certAndPrivKey.pem
macOS Sandbox: (using Binary provider API):
$ openssl s_client -connect gateway.sandbox.push.apple.com:2195 -cert certAndPrivKey.pem -key certAndPrivKey.pem
macOS Distribution (using Binary provider API):
$ openssl s_client -connect gateway.push.apple.com:2195 -cert certAndPrivKey.pem -key certAndPrivKey.pem
Note: After the TLS handshake is successful, the connection just sits there. So after you verify the TLS stuff worked, you can kill it with Ctrl-C.
After you complete the next task, you can delete both the certAndPrivKey.p12 & certAndPrivKey.pem files.
ZeroDark.cloud Dashboard Tasks
Go to the ZDC dashboard website, and log into your account. Then navigate to the Apps section, and click the notifications icon next to your app:
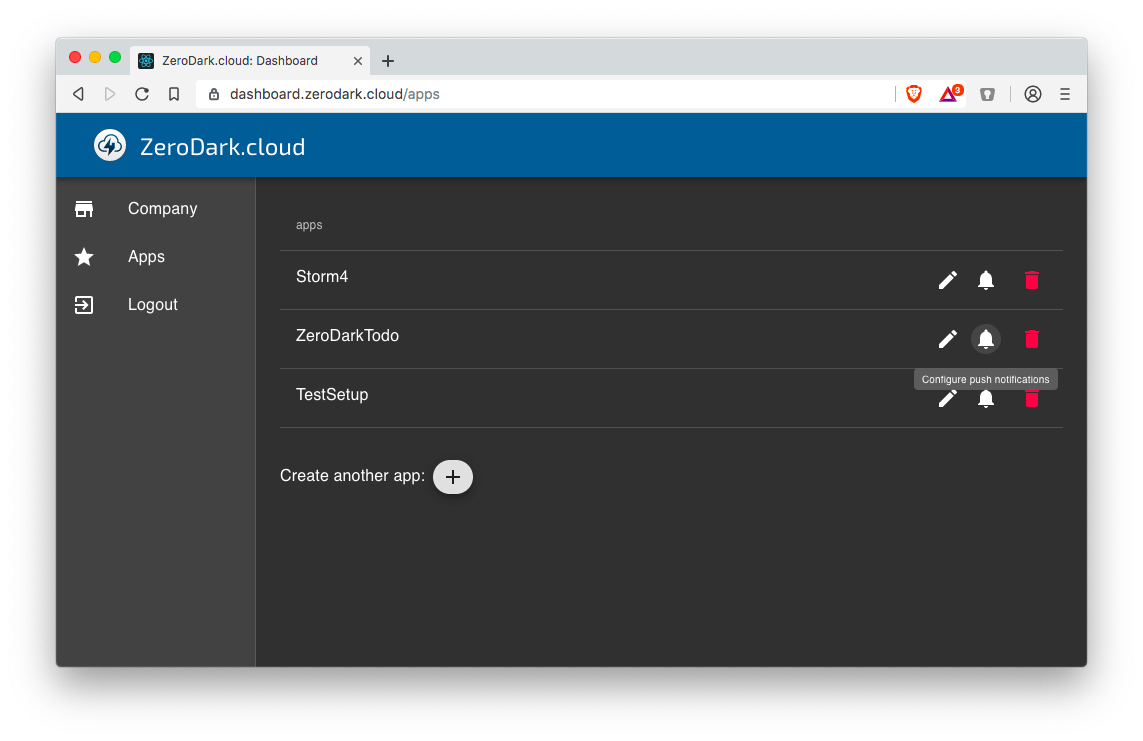
This will bring up a panel where you can configure notifications for each type of platform:
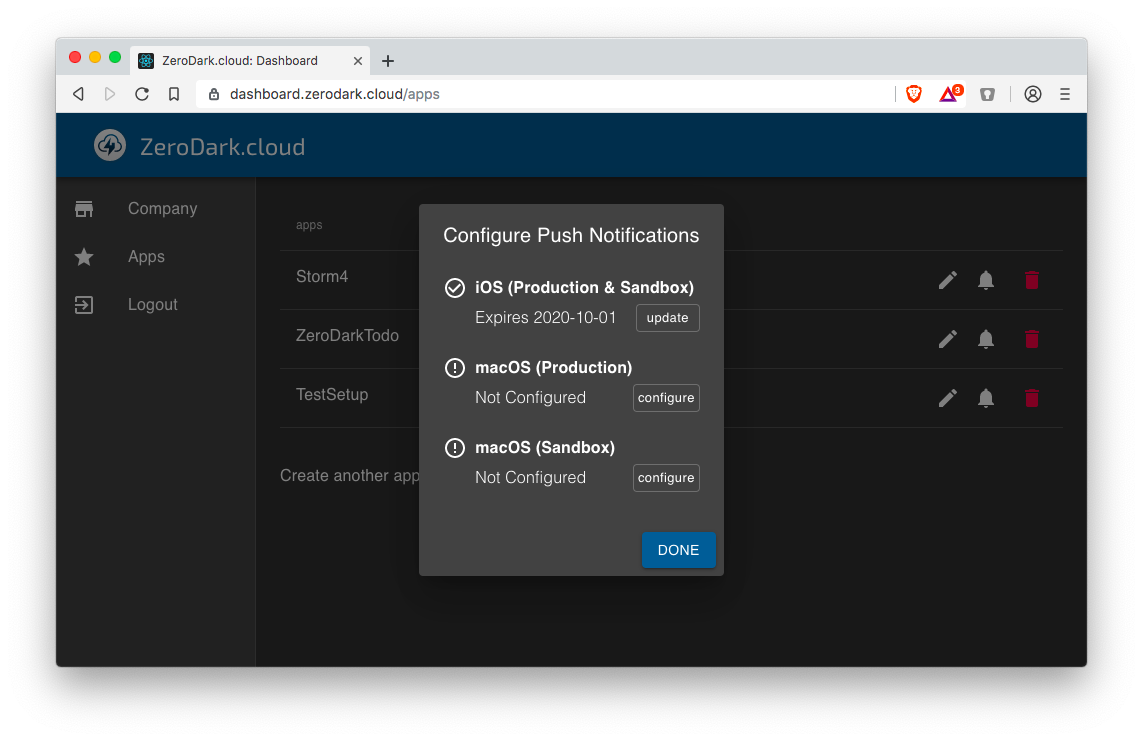
Click the button to "update" or "configure" the appropriate platform:
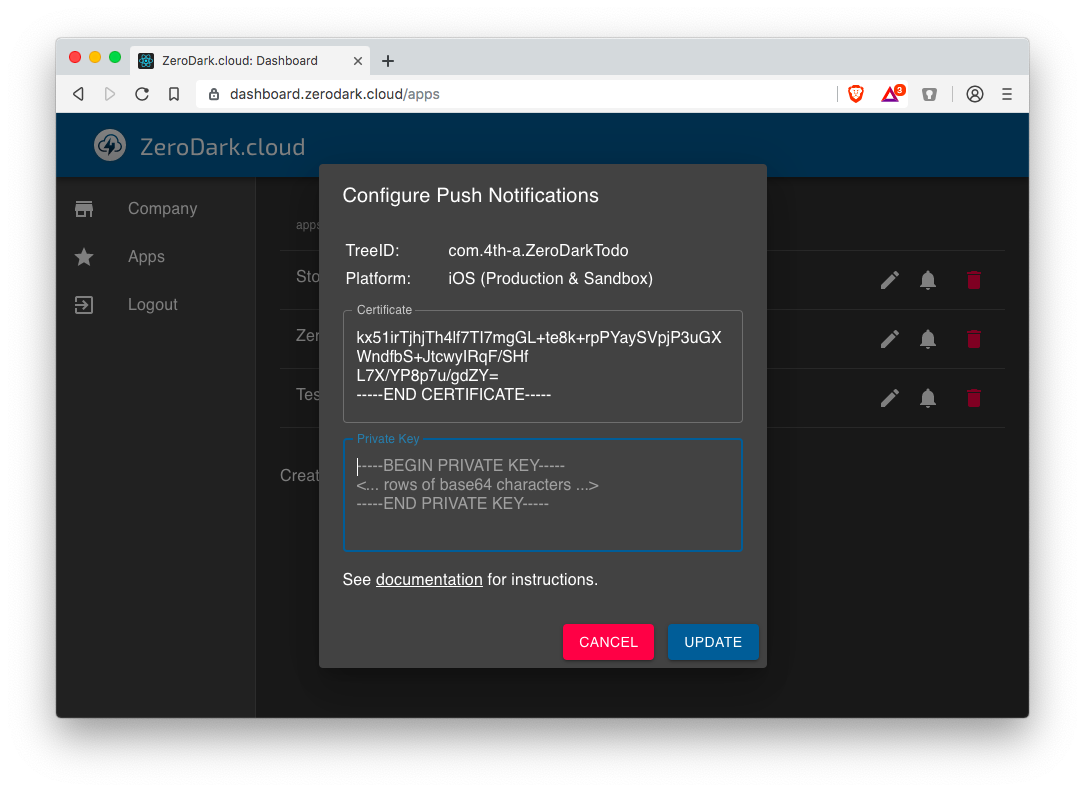
Now you can copy-n-paste the certificate & private key from your "certAndPrivKey.pem" file:
- For the certificate, copy the section that starts with the header
-----BEGIN CERTIFICATE-----, and ends with footer-----END CERTIFICATE-----(including the header & foooter parts). - For the private key, copy the section that starts with the header
-----BEGIN PRIVATE KEY-----, and ends with the footer-----END PRIVATE KEY-----(including the header & footer parts)
Notes
All push notifications sent from ZeroDark will look like something like this:
{
  "aps": {
    "content-available": 1
  },
  "4th-a": {
    "uid": "e11wpypyk39re8s3btg11eyuxf778gd3"
  }
}
In particular, they will always have a "4th-a" section, which contains all the push information. And within that, there will always be a "uid", with the userID that is the intended target of the push.
The ZeroDarkCloud framework will tell you if the push is meant for itself, or for you:
// Handle incoming remote notifications
func application(_ application: UIApplication,
                 didReceiveRemoteNotification userInfo: [AnyHashable : Any],
                 fetchCompletionHandler completionHandler: @escaping (UIBackgroundFetchResult) -> Void)
{
    // Forward to ZeroDarkCloud framework
    if zdc.didReceiveRemoteNotification(userInfo, fetchCompletionHandler: completionHandler) {
      // zdc is handling this push,
      // and will invoke completionHandler when done
    } else {
      // The push is not for zdc – it's for us.
      // So we need to handle this.
    }
}